Are you planning to update your shower but are not sure where to start with the tile layout? You’re not alone. Many Birmingham homeowners get stuck not on choosing the tile color or material, but on how to arrange them for the best look and function. That’s where this beginner’s guide to shower tile patterns comes in.
Whether you’re DIYing your shower or working with a contractor, this post will walk you through the basics: the most popular patterns, how to plan your layout, must-have tools, and smart prep tips to make your project go a whole lot smoother.

Why Tile Patterns Matter More Than You Think
The right tile pattern can change the entire vibe of your bathroom. It’s not just about style, it’s also about perception. A well-chosen layout can:
- Make a small shower feel more spacious
- Add a subtle or bold personality to your space
- Highlight the best parts of your shower design
- Increase the resale value of your home
Prep Smart: Safety Comes First
Planning to tile your shower? Great! But before you break out the tools, take a few moments to think about safety. Even a straightforward DIY project like tiling can pose risks if you’re not careful.
Here are a few basic precautions to help you get started safely:
- Protect your eyes when cutting or removing tiles—tiny shards can fly.
- Wear gloves to avoid cuts or scrapes from tools or sharp edges.
- Use a dust mask if you’re working in a poorly ventilated or dusty area.
- Know what’s behind your walls—use a pipe or wire detector to avoid damaging plumbing or electrical lines.
- Shut off the water and power to your bathroom if you’ll be working near either.
Taking a few extra minutes up front can save you a lot of trouble later.
Must-Have Tools for DIY Tiling
Even the best tile pattern won’t look good without the right tools. Here’s a basic kit for beginner tilers:
- Tape measure – for precise wall measurements
- Pencil or chinagraph marker – to mark tiles without smudging
- Tile cutter or wet saw – for clean, accurate cuts
- Tile spacers – to ensure even gaps for grout
- Notched trowel – for spreading adhesive evenly
- Grout float – for applying grout without scratching your tiles
- Spirit level – to make sure your lines are straight
- Bucket + mixing paddle – for adhesive and grout
- Sponge – to wipe away excess grout before it dries
Top Shower Tile Patterns for Beginners
Now to the fun part: choosing your pattern. These layouts are beginner-friendly but still deliver great visual impact.
1. Straight Lay (Grid Pattern)
Simple, clean, and timeless. Tiles are lined up evenly in rows and columns.
Best for: Small showers, modern or minimalist bathrooms.
2. Offset (Brick Bond)
Each tile is staggered like a brick wall, adding texture without complexity.
Best for: Traditional styles or when using subway tiles.
3. Vertical Stack
Tiles are stacked vertically instead of horizontally, drawing the eye upward.
Best for: Low ceilings or small bathrooms in older Birmingham homes.
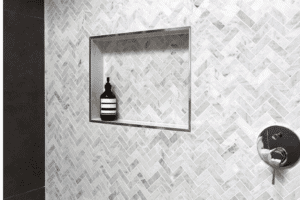
4. Herringbone
Tiles are laid in a zigzag, creating movement and visual interest. It’s a bit more complex to install but delivers a high-end look.
Best for: Accent walls or modern spaces.
5. Diagonal (Diamond)
Squares turned at a 45-degree angle make the shower appear wider.
Best for: Narrow shower stalls or when you want a unique twist on a basic pattern.
How to Plan Your Tile Layout
Once you’ve picked a pattern, here’s how to map it out:
- Choose a focal point – Often, the wall you see first when you enter the bathroom.
- Mark your center line – Start in the middle and work outward for a balanced look.
- Lay a dry run – Place a few tiles with spacers on the floor to see how they’ll look.
- Use your level – Make sure your first row is perfectly straight before moving up or out.
Installing Shower Tile: Step-by-Step
Once your tile pattern and layout are planned, it’s time to bring your vision to life. Here’s a simplified step-by-step guide to help you understand the process from prep to polish:
1. Prep the Wall
Make sure your shower walls are clean, dry, and flat. If you’re working with drywall, you’ll need to install a cement board or waterproof backer board as your tiling surface.
Tip: For wet areas like showers in humid Birmingham homes, a waterproof membrane is highly recommended to prevent moisture damage.
2. Measure and Mark Your Layout
Use a tape measure, pencil, and spirit level to mark your center lines on the wall. Double-check everything before applying adhesive this ensures your pattern starts straight and stays even.
3. Mix and Spread Adhesive
Use a notched trowel to spread tile adhesive over a small section of the wall (around 1 sq. meter at a time). Hold the trowel at a 45-degree angle for even coverage.
4. Place the Tiles
Press each tile firmly into place following your marked layout. Use tile spacers between each tile to maintain consistent grout lines. Work outward from the center and from bottom to top.
5. Cut Tiles as Needed
Use a tile cutter or wet saw to trim edge tiles or fit around fixtures. Measure carefully, mark with a pencil, and always wear safety gear when cutting.
6. Let Adhesive Set
Allow the adhesive to cure fully—typically 24 hours—before moving on to grouting. Avoid touching or bumping the tiles during this time.
7. Apply Grout
Once the adhesive is dry, use a rubber grout float to press the grout into the spaces between tiles. Hold the float at a diagonal and work in small sections. Wipe off excess grout with a damp sponge before it dries.
8. Let Grout Dry and Seal if Needed
Allow grout to dry for at least a few hours (or overnight, depending on the product). If you’re using natural stone tiles or cement-based grout, apply a grout sealer to protect against moisture and staining.
Choosing the Right Tiles for Your Shower

In humid Birmingham weather, moisture-resistant tiles are a must. Go for:
- Porcelain or glazed ceramic – Durable and waterproof
- Textured tiles – For slip-resistance on floors
- Neutral colors – Work well in resale situations, but bold accent tiles can make a statement
Always buy extra tiles about 10–15% more than you need to account for cuts and breakage.
DIY vs Hiring a Pro in Birmingham, AL
While many homeowners enjoy the satisfaction of tiling their own showers, complex patterns like herringbone or hexagon may be best left to professionals. Local tile contractors in Birmingham are familiar with the region’s climate and can ensure proper waterproofing, especially in older homes.
Pro tip: If you’re tackling this on your own, focus on a straight lay or brick pattern to start. You can always level up on your next project!
Conclusion
Choosing the right shower tile pattern may seem like a small decision, but it can make a big difference in how your bathroom looks and feels. From simple grid layouts to eye-catching herringbone, there’s a pattern for every style and skill level. Whether you’re going DIY or hiring a pro, understanding your options helps you plan smarter and avoid costly mistakes.
Ready to get started? Keep this guide handy as you plan your bathroom update, and don’t hesitate to reach out to a Birmingham tile expert if you need help. Sometimes, having a professional handle the details can save you time, money, and stress.

