Thinking about updating your bathroom but unsure where to start? Many Birmingham, Alabama, homeowners feel the same way. Tiling a shower might seem daunting, but with the right tools and guidance, it’s a manageable DIY project.
This guide on how to tile a shower in Birmingham will walk you through each step, helping you save on labor costs while achieving a beautiful result.
Why DIY Shower Tiling is Popular in Birmingham
With a mix of old and new homes, Birmingham homeowners are embracing DIY shower tiling as a way to boost their home’s appeal and value. The city’s humid climate makes waterproofing essential, but with the right tools and knowledge, this project is manageable and rewarding.
Tools and Materials You’ll Need
Before you begin, gather the following tools and supplies. Many can be found at Home Depot, Lowe’s, or Floor & Decor locations around Birmingham:
- Cement backer board (e.g., HardieBacker)
- Thin-set mortar (tile adhesive)
- Notched trowel and level
- Grout, grout float, and grout sealer
- Tile spacers
- Wet saw or manual tile cutter (rentable locally)
- Safety gear (gloves, goggles, dust mask)
Pro Tip: Always buy about 10% more tile than your total surface area to cover breakage and future repairs.
Types of Tile to Use for Showers

For a durable and stylish shower, choose moisture-resistant tiles like porcelain, ceramic, glass, or natural stone, keeping in mind the importance of slip resistance for the floor.
Porcelain and Ceramic Tiles
These are the most popular choices for shower walls due to their excellent water resistance and ease of maintenance. Porcelain tiles are denser and more durable, while ceramic tiles are a bit more affordable but still offer reliable performance.
Glass Tiles
While stunning and sleek, glass tiles are less durable than porcelain and ceramic. They can work well for accent walls, but make sure to use them in combination with other, more durable tiles.
Natural Stone Tiles (Granite, Marble, Travertine)
These tiles are beautiful but can be porous, so they require sealing to prevent water absorption. They’re ideal for a luxurious look but require more maintenance.
Remember to choose tiles that are slip-resistant for the floor area to minimize the risk of slipping when the floor is wet.
Safety Considerations
Tiling a shower involves using tools and materials that require careful handling. To keep your DIY project safe and efficient, follow these key safety guidelines:
Protective Gear
Always wear gloves, safety goggles, and a dust mask when cutting tiles or working with adhesives. This will protect your hands from sharp edges and your lungs from dust particles.
Tool Safety
If you’re using a wet saw or manual tile cutter, make sure to read the manufacturer’s instructions carefully.
Wet saws can be dangerous if mishandled, so always keep your hands clear of the blade and keep the workspace dry to avoid electrical hazards.
Ventilation
Ensure your workspace is well-ventilated, especially when working with strong adhesives or grout. Open windows or use fans to avoid inhaling fumes.
Careful Cutting
When cutting tiles, take your time to measure and cut slowly. This reduces the risk of mistakes and injuries. Always keep your hands steady and make sure tiles are securely clamped before cutting.
How to Tile a Shower in Birmingham: Step-by-Step Guide

1. Prep the Surface
Remove old tiles and inspect the wall structure. Install cement backer board to create a moisture-resistant foundation.
2. Waterproof the Area
Use a waterproofing membrane like RedGard, especially in corners and seams. Birmingham’s high humidity makes this step critical.
3. Plan Your Layout
Use a level and draw a horizontal reference line around the shower wall to keep tiles straight. Dry-lay a row of tiles to check your spacing.
4. Apply Adhesive and Install Tiles
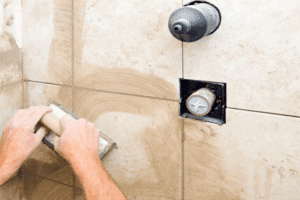
Spread thin-set mortar with a notched trowel. Begin tiling from the bottom center of the wall and work your way outward and upward. Use spacers between each tile.
5. Cut Tiles as Needed
Use a wet saw to cut tiles for corners and edges. Take your time, accurate cuts make a big visual difference.
6. Let Tiles Set
Allow the adhesive to dry for 24 hours. Avoid using the shower during this time.
7. Grout and Seal
Apply grout using a rubber float. Wipe off excess grout with a damp sponge. Once dry, apply grout sealer to prevent moisture and mildew buildup.
Mistakes to Avoid When Tiling Your Shower
- Skipping waterproofing: Alabama’s humid climate makes this non-negotiable.
- Improper tile layout: Plan tile placement before sticking them to the wall.
- Not checking for level: Use a level after every row to ensure straight lines.
- Using the wrong tile type: Only use water-resistant ceramic or porcelain tiles for shower areas.
- Rushing the drying process: Let adhesive and grout fully cure before using the shower.
Aftercare Tips for Your Tiled Shower
To extend the life of your work and keep your Birmingham shower mold-free:
- Clean weekly with a pH-neutral, non-abrasive bathroom cleaner.
- Reseal grout annually to maintain water resistance.
- Inspect caulk at seams regularly and reapply as needed.
Conclusion
Tiling your shower can be a rewarding DIY project, and with the right tools and preparation, you can achieve great results. Remember, taking your time with each step, especially waterproofing, is key to a long-lasting finish.
If at any point you feel unsure, don’t hesitate to reach out to a professional tile installer for assistance. With the right approach, you’ll have a beautiful, functional shower in no time!

