Although it may not attract much attention daily, your backsplash has a big impact on the way your kitchen looks and works. Its main purpose is, of course, to keep the space below your sink safe in case you become a bit too enthusiastic when cooking or cleaning. However, it also acts as a background that you can use to create a stunning focal point in your kitchen and inspire original backsplash ideas.
Here’s what to expect during a kitchen backsplash installation if you’re thinking about putting in new tiles but want to know more about the process.
What To Expect During A Kitchen Backsplash Installation?

Here are some of what to expect during a kitchen backsplash installation if you’re prepared to take on the task yourself.
Measuring The Area
After deciding on the kind of tile you want to use, you need to figure out how everything will go together. To determine the square footage of the area you wish to tile, use a tape measure. This is going to help you determine how many pieces of tile you need.
Calculate how much material you’ll need to cover your wall by considering the size of your tiles. It helps in estimating how much mortar and grout you will need. A 10% increase in the overall square footage is a smart concept. It will be helpful to have some additional tile available in case you need to fill in any gaps or if some break while installing.
Choosing The Backsplash Style
This may vary depending on your budget, level of expertise, and desired amount of regular maintenance for your kitchen backsplash. Doing it yourself can result in significant savings because professional installation can boost costs by an average of $15 per square foot.
Gathering The Materials
Gather all the materials needed to perform the installation beforehand. This consists of caulking, spacers, a thin-set mortar, a bucket, a sponge, rags, a utility knife, a tape measure, a level, and a tile cutter.
When laying backsplash tile, one common mistake is to assume that a level and spacers won’t be necessary. If you try to solely focus on the visual aspect of your backsplash, it will direct your attention in the incorrect direction.
Cleaning The Kitchen Wall
After turning off the electricity in your kitchen and taking off any outlet covers, thoroughly clean the wall with a sponge or damp cloth and allow it to air dry.
Making A Layout Plan
Make your backsplash tile installation layout in advance. Tile sheets, including those that have been cut to different sizes, should be taped to the wall using painter’s tape.
Cutting The Tile
You’ll have to make some cuts when you get to install an outlet or light switch. You have a few cutting alternatives for ceramic tile installation, and they differ in terms of cost, convenience of use, and cut quality. To cut the expense of your backsplash project, think about renting some tools from your neighborhood hardware store.
Applying The Mortar
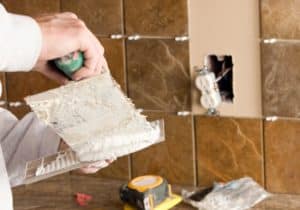
Using a trowel with a notch, apply the thin-set mortar before beginning the tile installation. Install tile spacers as you proceed to prevent uneven backsplashes. When you’re happy, press the tiles firmly onto the wall with a clean grout float.
Installing The Tile
The true moment has arrived! Lean in and inhale deeply. This is something you can handle.
Prepare your adhesive beforehand. Your DIY backsplash project will take less time to complete if you use a pre-mixed adhesive. However, the binding strength of a mixed thin-set mortar is not always evident. Use the mortar according to the mixing directions on the package if you’re using one. Using your drill and mixing attachment, combine your product in your bucket.
Remember that after mixing mortar, you typically have four hours to utilize it.
As you place the tile pieces along the wall, place tile spacers between each one. This preserves the alignment of the tile pieces and provides room for grout. Rock the tiles gently in a direction perpendicular to the ridges in the mortar. This makes it easier to the tile’s placement. If necessary, a grout float might help flatten the tile. As you work, use a level to make sure everything is level.
Applying The Grout
Apply the tile grout once the mortar has had around 12 hours to cure. Use the grout float to thoroughly work it to ensure that there are no gaps or holes. This is crucial if you utilize mosaic tiles to create a unique picture for your kitchen backsplash because even the smallest air bubble or gap could have disastrous effects.
Cleaning The Area
After removing any extra grout with a moist sponge, clean the tiles of any residual haze that may have developed during the grouting process with a dry cloth or towel.
Sealing The Grout
Maintaining your backsplash can be simple if you use the grout sealer. By preventing discoloration, the sealer will maintain the original appearance of your backsplash. Finally, cover the gap created by your backsplash where it meets any top cabinets or windows with caulk.
Common Mistakes To Avoid When Installing Kitchen Backsplashes

Complex kitchen remodeling projects often involve significant interior design work.
To guarantee a faultless outcome, it’s critical to take care and pay careful attention at every stage of the process, from sorting through creative backsplash ideas to selecting the ideal type of easy-to-clean backsplash tile.
- Not confirming measurements twice
- Forgetting to tuck the tile in loosely
- Not using spacers while putting in a backsplash tile
- Utilizing grout that is not tile-matched
- Not using enough grout
- Trying to cut yourself
- Putting the backsplash tile in your kitchen behind the stove
- Ignoring the recommendations of a skilled professional
- Not purchasing extra tiles
- Believing it to be a simple do-it-yourself job
Final Thoughts
Knowing what to expect during a kitchen backsplash installation is essential if you’re remodeling your kitchen or want to have one installed, whether you choose to do it yourself or hire a professional. You can prepare your time, money, and tools by being aware of it. Start by being aware of what to expect so that you can achieve the kitchen backsplash you want.

